It took a while to get here, but it is time to assemble a description of what it takes to bring Elysia clarki through its complete life cycle. The following is based on observations of many broods that hatched between 2014 and 2017 but largely failed to take their first meal, and about a dozen broods reared successfully in between December 2017 and March 2018.
All things considered, I would rate Elysia clarki to be one of the easiest marine invertebrates to maintain, breed and rear. However, you need to be equipped appropriately, and there is more than one way to skin this particular dead cat. If you live on the coast and can collect a steady supply of algae, it is possible to culture slugs in simple tanks with little more than aeration and regular water changes. The approach I have used is to cultivate all of the necessary plants and animals in the lab. It is more expensive and labor intensive, and the dynamics of slug and algal cultures can be nerve-wracking, but it can (in principle) provide a predictable supply of slugs in a places that do not have ready access to wild marine algae.
Materials
For Broodstock:
- Adult slugs (2 – 3). They are hermaphrodites, so any two will do.
- Constant supply of food. Adults thrive on Bryopsis pennata, which I find easiest to culture, but they will also eat B. plumosa and Penicillus.
- 15 gallon tank or larger.
- High intensity LED light (e.g., Evergrow D120)
- Pump for circulation, with intake protected by sponge (see Slug-Safe Circulation)
Larval rearing:
- Bryopsis plumosa. This seems to be key to getting them to start feeding. Although hatchlings have been reported to eat Derbesia tenuissima, I have not succeeded with Derbesia species available locally. Baby slugs will not (cannot?) eat B. pennata until they are at least a few weeks old, possibly because B. pennata is coarser and therefore harder for their little radullas to penetrate.
- Ivermectin. Good for reducing or eliminating predators on food algae. Often prescribed as an anti-parasitic treatment. Effective at very low concentrations on many species of flatworms, worms, and arthropods (Grant and Briggs, 1998, Mar. Poll. Bull. 36:540). By pure evolutionary luck, vertebrates and mollusks tolerate relatively high concentrations. Nonetheless, it is probably best to rinse treated algae thoroughly before adding to Elysia cultures. Working concentration 500 ng/ml (stock 5 mg/ml in DMSO).
- Rifampicin. Broad-spectrum antibiotic for eggs and hatchlings. Working concentration 5 μg/ml (stock 5 mg/ml in DMSO).
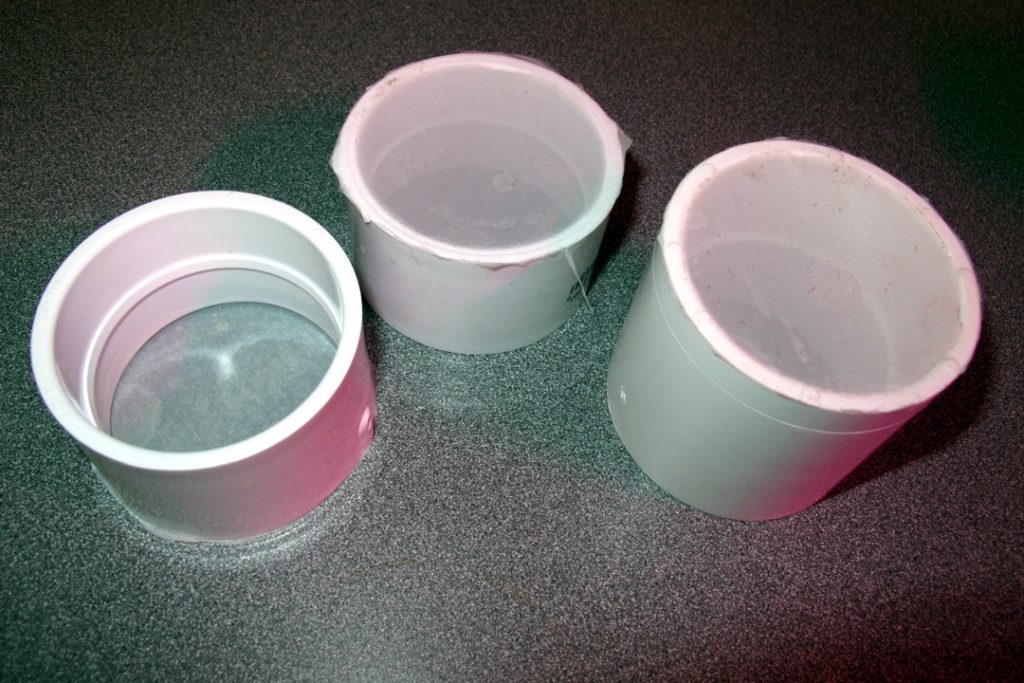
- Sieves made from 2″ PVC couplings, one end covered by 52 micron nylon mesh. Great general-purpose strainer for cleaning eggs, veligers, and baby slugs.
- Crystallization dishes (I use 80 X 40 mm) or similar for eggs and young hatchlings
- Small glass baking dishes for growing out baby slugs (7″ X 5″ is nice) .
How it works.
One adult will lay a clutch of a few thousand of eggs in a gelatinous matrix every two weeks on average. If all of the hatchlings were to survive to adulthood, they could fill a room in a few months. Eggs are normally laid on the food plants, but one occasionally gets lucky and finds them on the glass sides of the aquarium. There is no apparent seasonality, in that I have collected egg masses throughout the year.

The downside of collecting eggs masses from among plants is that they usually carry pieces of algae, and potential predators, along with them. With some care, most or all filamentous algae like Bryopsis can be removed, but it can be more troublesome when eggs are glued to a flat alga like Udotea.

Once collected, eggs are easily reared in glass dishes. Crystallization dishes covered by plastic Petri dishes are easy to observe under the microscope and easy to clean. During embryonic development, the eggs are protected by the gelatinous matrix, and they normally mature to hatching without much trouble. Nonetheless, rinsing every few days with ASW and treating with rifampicin helps keep predators and pathogens at bay.

Eggs hatch in 16-18 days at room temperatures between 22 and 25 degrees C. Larvae are shelled, free-swimming veligers that buzz around their container using ciliated lobes called vela (singular velum). Because of the small size of the container, veligers often strike the top surface and become trapped in surface tension, with groups floating around as rafts. Although it looks sad, floating does not appear to be harmful.

Veligers settle within 2-3 days, finding a solid surface, and literally crawling out of shell as tiny slugs. Veligers floating in the surface tension can easily crawl out of their shells and onto plants at this time. At this stage, they have no parapodia or rhinophores.

The post-hatching period is absolutely critical. Hatchlings can starve, be eaten by predators or killed by pathogens. Soon after settling, they need fresh Bryopsis plumosa in order to start feeding. Treating the algae with ivermectin and rifampicin greatly reduces (but generally does not eliminate) the load of predators and pathogens. Dumping larvae and algae into a 2″ PVC sieve and rinsing with fresh ASW every few days also seems to help. It is very sad to watch precious, tiny sluglets being eaten like popcorn by flatworms or dissolved by ciliates, so keeping the cultures as clean as possible is important.

For several days, the juveniles do not appear to ingest much. Within a week, however, it is possible to see dark green chloroplasts filling their little, clear bodies. At this stage, the presence of digestive diverticula is particularly striking, with branches visible throughout the body and even the head.

Within another week, rhinophores start to appear on the head, with parapodia soon to follow.


Once they are eating, they can be moved to larger quarters. Glass baking dishes will do the job.


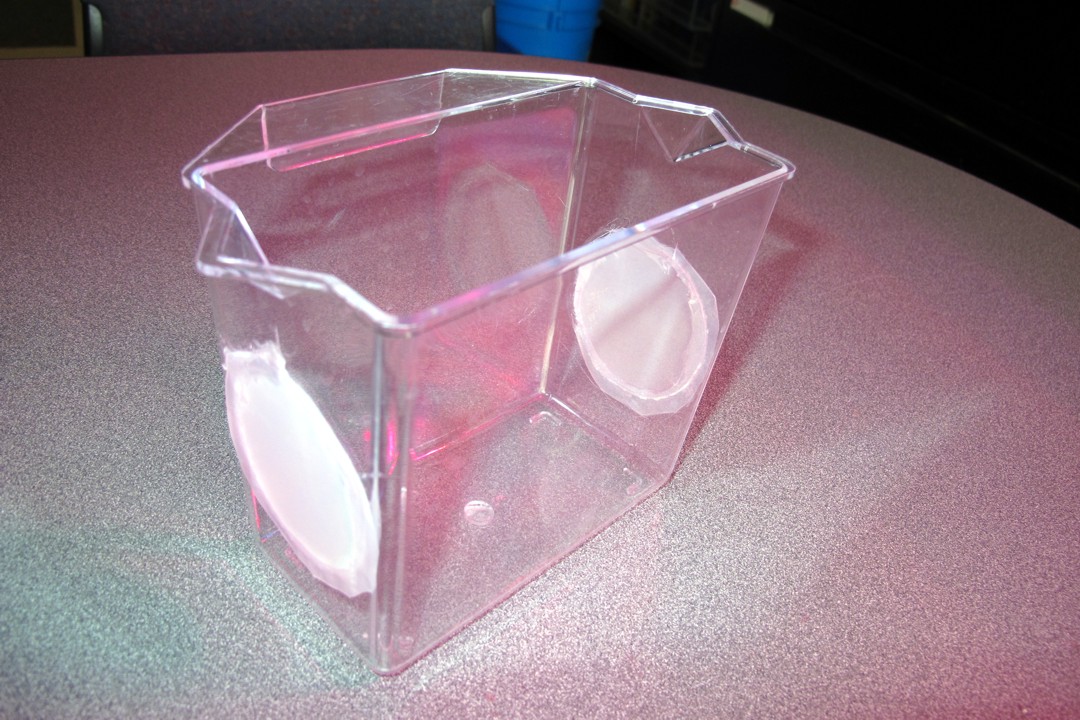
It is also possible to drill large holes in specimen containers or other small plastic containers, and place nylon mesh over the holes. These can be placed in larger tanks, and fed by a constant slow flow of fresh ASW, with the mesh serving to keep the baby slugs inside. Within three weeks after hatching, they can be recognized seen (barely) as slugs by the naked eye, and look like teensy versions of the adult.

Once you reach this point, you can breathe a momentary sigh of relief, because survival is extremely high beyond this stage. Losses from predators or pathogens are rare, and they can even survive occasional trips through pumps. Youngsters can soon be shifted to B. pennata.
After briefly resting on your laurels, you then ask yourself “what do I do with hundreds of baby slugs, and how will I possibly feed them?” What appears to be several dozen tiny slugs can turn out to be several hundred.

Next thing you know, you have a tank jammed with young Elysia.

If you find yourself with a need for hundreds of slugs, then you’re in luck. For the rest of us who do not have the resources to grow literally pounds of algae per week, or a need for an army of Elysia, it is important to be judicious in setting up eggs to be reared. Based on my experience, it is possible to rear predictable numbers, especially given the low mortality of the slugs within a few weeks after hatching.
Once established, they grow and grow. The substantial sluglet below was barely visible with the naked eye two weeks before.

A week or so later, they still have some growing to do, based on a size comparison with mom below.

Two months after hatching, they have reached full adult size, larger than most I have received from collectors.

The new slugs are able to fertilize another slug, and may be able to lay eggs within 2 months. The oldest from the first brood were transferred to a tank with an older female , so I cannot be certain who is laying the eggs for now. I do know that someone has to be fertilizing them, though, so the young slugs are at least able to act as males.
There is still a lot to learn about their life cycle, such as the role of light, flow and water chemistry in inducing reproduction. Because I now have slugs whose hatching date is known within a few days, I can also get a precise measure of their lifespans.
Recent Comments